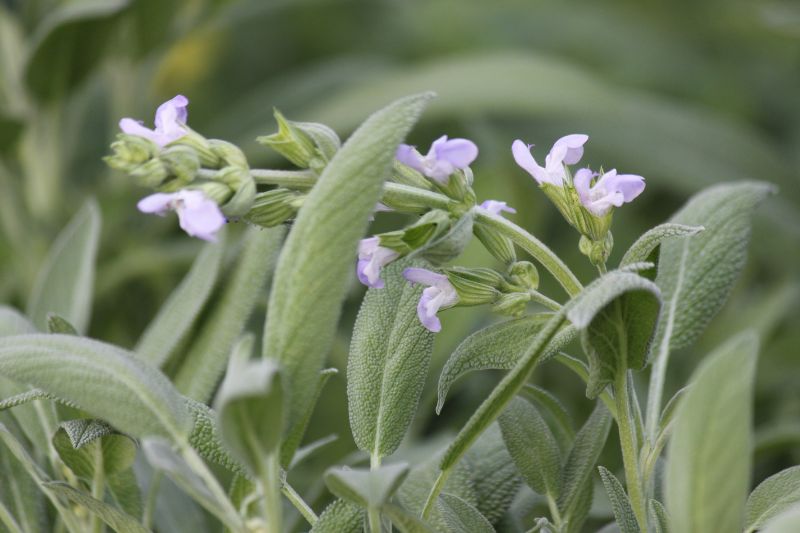
Sage is a versatile herb that serves both culinary and medicinal purposes. Loved for its aromatic leaves and beautiful purple flowers, it’s a popular choice for indoor herb gardens. So, whether you’re growing sage for your kitchen or just for its flowers, this guide will cover all you need to know.
Table of Contents
1. General Information & Taxonomy
| Scientific name: | Salvia officinalis |
| Common names: | Common sage, Garden sage, Kitchen sage |
| Native to: | Mediterranean region |
| Toxicity: | Non-toxic to humans; toxic to some pets |
| Mature size: | Up to 2–3 feet |
| Category: | Perennial |
| Growth Rate: | Moderate |
| Hardiness: | USDA zones 4–10 |
| When to plant it indoors: | If you intend to keep the sage indoors year-round, you can technically start it at any time. You can even grow this herb during winter. |
| Culinary uses: | Seasoning meats, stuffing, teas |
| Medicinal uses: | Anti-inflammatory, antioxidant |
2. Growing Sage indoors from Seeds
Seedling Care
- Preparation: You’ll need small pots or seed trays with well-drained, loamy soil. Pre-moisten the soil without making it soggy.
- Planting: Sow the sage seeds about ¼ inch deep, spaced at least 2 inches apart. Gently cover the seeds with soil.
- Location: Place the pots in a warm, sunny spot, ideally with a temperature range of 65–70°F (18–21°C).
Germination Time
- Sage seeds generally take between 10 to 21 days to germinate. Some varieties might take a bit longer, so patience is key.
Optimal Soil for Germination
- The best soil for sage seed germination is a well-drained, loamy soil with a pH level between 6.0 and 7.0. You can also add some organic matter or compost to improve its quality.
After Germination
- Once the seedlings have at least two sets of true leaves, they can be carefully transplanted into bigger pots.
3. Growing Sage Indoors from Cuttings
How to Take a Cutting
- Choose a healthy, disease-free sage plant. Using a sharp, sterilized pair of scissors or pruning shears, cut a 4–6 inch stem from the parent plant just below a node (the area where a leaf joins the stem).
Rooting Process
- Water Rooting: Place the cut end of the stem into a glass of water, ensuring that at least one node is submerged. Change the water every few days and place the glass in a warm, sunny spot.
- Soil Rooting: You can also plant the cutting directly into soil. Insert the cut end into a pot filled with well-drained soil, burying at least one node. Water lightly.
Root Development
- Whether you choose water or soil rooting, roots should begin to develop in 2–4 weeks. Once the roots are at least an inch long, the cutting is ready to be transplanted.
Transplanting
- Carefully remove the rooted cutting from the water and transplant it into a larger pot filled with well-drained soil, or into your indoor garden.
4. Sage Care & Growing Requirements Indoors
» Watering
Sage prefers to be on the drier side, so you should let the topsoil dry out between waterings. Use the ‘soak and dry’ method, where you water the soil thoroughly and then allow it to dry out before the next watering.
» Light
At least 6–8 hours of full sun per day is ideal for optimal growth, so it’s best if you can place it near a south or west-facing window.
However, if you don’t have enough natural light, you can supplement with artificial grow lights. Make sure to choose lights that mimic the sun’s natural spectrum. Also, be careful with the placement, as grow lights can actually burn your plant’s leaves.
» Soil
Well-drained, loamy soil with a pH of 6.0–7.0 works great for sage plants. Avoid soil that retains too much moisture, as they prefers drier conditions.
You can improve your soil’s drainage by adding organic matter or sand. A layer of mulch on top can also help retain just the right amount of moisture.
» Temperature
Sage prefers temperatures between 60–70°F (15–21°C). It can tolerate lower temperatures but should be protected from frost.
Sudden temperature changes can stress the plant, so try to maintain a consistent temperature, especially during the growing season.
» Humidity
Sage is relatively tolerant of varying humidity levels but prefers moderate humidity. If the indoor air is too dry, especially during winter, you can use a humidity tray or group multiple plants together.
» Fertilizer
Use a balanced, all-purpose fertilizer with an N-P-K ratio of about 10-10-10 and fertilize your sage once a month. Be cautious not to over-fertilize, as this can lead to lush foliage with reduced flavor and aromatic qualities.
5. When and How to Harvest Your Sage
» When to Harvest
Sage has the most potent flavor just before it blooms. You’ll notice flower buds forming at this stage; this is the perfect time to harvest.
» How to Harvest
Use sterilized scissors or pruning shears to snip leaves or stems, avoiding the woody parts of the plant. Always leave at least a couple of inches of growth so that the plant can recover and continue to grow.
» Post-harvest Care
Sage leaves can be used fresh or preserved for later use. To dry them, hang small bunches of sage in a well-ventilated area away from direct sunlight. Once dried, store in an airtight container.
You can also freeze sage leaves by placing them in a single layer on a baking sheet and then transferring them to a ziplock bag once frozen.
» Harvesting Tips
Frequent harvesting encourages new growth but avoid taking more than one-third of the plant at a time.
If your sage plant has flowered, the leaves may have a milder flavor. Consider harvesting earlier next season for stronger-flavored leaves.
Conclusion
Sage is an easy-to-grow, multi-purpose herb that deserves a spot in your indoor herb garden. With proper care, you can enjoy its aromatic leaves in your cooking or as a natural remedy.
Remember to choose the variety that best suits your needs and to harvest just before the plant blooms for the most potent flavor and medicinal properties.


No Comments